Home - OUTDOOR SPORTS - How To Ride A Hoverboard? A Step-By-Step Guideline
How To Ride A Hoverboard? A Step-By-Step Guideline
You’ve seen them in the news, you’ve seen them on YouTube, and now they’re finally here. Hoverboards are one of the hottest new gadgets out there, and we want to help you get started with your first hoverboard.
The first time you saw it, you might have been surprised and confused. What is this thing? How does it work? Luckily, we’re here to help!
This blog post will show you how to ride a hoverboard and some safety gears that will come in handy for your safety!
First off, you will need to get on your hoverboard before riding it anywhere.
1. Do read the product’s manual carefully if there are. Yet, many brands won’t provide you with this thing. So, you can skip this step in that case only.
2. Find an open space that is clear, and an even, flat surface to position your hoverboard.
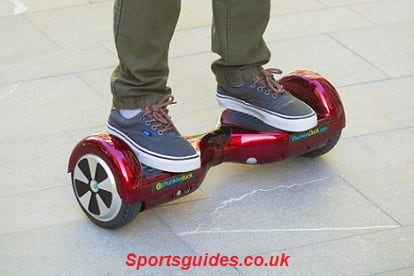
Riding a hoverboard.
Tips: Place it next to objects that you can reach out to so that you can keep yourselves stable as you might fall if you’re not used to keeping balance upon such things.
3. Don’t forget to turn the hoverboard on before placing your foot on it, or else the balancing mechanisms won’t be activated. You can often find that button near the port where you charge it.
4. Put the dominant foot on the pad that is over one of the two wheels, maintaining it flat and tilt-free. If the light by the battery indicator goes green, put your other foot on. Yet, if the colour is red, switch off your board, then try again. Contact your supplier if the issue remains.
5. After you have two feet standing on the hoverboard, they should be hips-width from the other, and once again, keep them flat.
6. It’s best to learn to balance by standing still and with a straight back. If you feel comfortable enough, let’s move to the next section to learn how to move it around.
How To Ride A Hoverboard?
To not disrupt your first try, make sure you’ve fully charged your hoverboard. It’s best not to panic and relax your sense while starting at a slow pace first.
Remember that leaning too far would result in unexpected accidents. You may even fall off the hoverboard! So, try to lean slightly forward to move.
Let’s see all the tips we have to offer:
1. Moving Forward And Backward
As mentioned above, make slightly leaning where you want to head. Here, the limitation is 10 degrees. You should be making those movements in the ankles, not your waist.
It’s a fun activity.
2. Turning
Pushing your toes to the front allows you to turn the hoverboard.
For the left side, use the right toes. Your weight will then be distributed to the right side. Horizontally keep the other foot. If you find this foot thing difficult, just lean in any direction you want to.
For the right side, well, it’s similar. You can lean to your right side or push your left foot!
The more weight you distribute to the panel, the sharper you turn!
3. Spinning In Circles
Do you wonder how people spin in circles with the hoverboard? It’s quite simple, actually. They push their toes down on one side, at the same time, they also push the other foot’s heel down. Not only can this technique enable you to do such art, but it can also create sharper turns!
4. Speeding Up
Don’t be surprised. Hoverboards can travel as fast as ten mph and even faster. You can speed up by just leaning forward, as mentioned.
Some variants provide users with speed limitation mode. With this feature, you can not exceed that limit no matter how much you lean forward. If there is no such feature in your hoverboard, it will speed up until the board gets to the maximum number.
Nonetheless, it’s quite secure that some brands have a warning system in case you’re close to such speed.
5. Stopping
It’s simple, just return your pose to that upright standing position in the centre of your board. Don’t lean forward anymore! This way, you’ll be slowing down until you are able to step off from it.
Then, step the dominant foot back, followed by the other one, so the board is in front of you.
Safety Gear While Riding A Hoverboard
Especially for newbies, safety gear is extremely important:
Elbow pads
Wrist guards
Helmet
Knee pads
Buying one tailbone protector in the form of padded shorts is optional.
Make sure you have all your safety gear on!
Don’t ever underestimate the speed of this board. Though it’s 8 – 10 km/h, remember that this speed is only slow for cars, not for walking or running! That’s why getting proper safety gear is the first step you should take if you want to experience this technology.
One more thing to notice, it is likely that your board doesn’t come with lights. Since you might be wandering the street at night or in low light circumstances, getting shoe lights would be necessary. This is not only for you to easily see it but also to alert others of your board’s presence.
With a little practice, you’ll be riding your hoverboard in no time. We hope this post helped you understand the basics of how to ride a hoverboard. If you have any questions, please make sure to leave them in the comments section below, and we’ll get back to you as soon as possible! Let’s try riding one together now that we know what it takes. Be careful, and don’t forget your safety gear!